

Birds don’t wait for runways. They just take off when they’re ready.
Revit workflows shouldn’t need them either. BIM data automation and custom integrations remove the long runway of manual exports, spreadsheets, version change emails, and rework.
In this blog, we’re breaking down three specific automations that pay for themselves in 60 days, the real costs you’re already paying for manual processes, and the build-vs-buy decisions that determine whether this actually gets implemented.
TL;DR
Manual data transfer between Revit and other systems costs you $125K annually per project. Three specific automations—clash detection workflows, quantity takeoff sync, shop drawing cross-reference—eliminate this tax and pay for themselves in 60 days. Custom development ($15K-$40K) makes more sense than off-the-shelf platforms for most GCs
The Hidden Tax You’re Already Paying
Four hours per RFI cycle. That’s model update, manual export, Excel manipulation, email threads, re-input, version control cleanup.
Do the math: 4 hours × 40 RFIs monthly = 160 hours per month moving data between systems. Nearly $125,000 annually in labor cost alone.
The worse cost is invisible. While your team reformats spreadsheets, coordination issues slip through. Estimators get blindsided by quantity changes because model updates never reached the cost system. Critical path activities drift because shop drawing reviews sit in email limbo waiting for someone to finish last week’s exports.
You already know this is expensive.
Start here: Pick your most painful manual workflow. Time it next week with a stopwatch. Multiply by frequency. That’s your business case. Most integration projects cost $15K-$40K and break even in 6-12 months.
The tax is real. The ROI is faster than your approval cycle.
What Integration Actually Means
Real integration makes the tools you already rely on exchange data automatically, without exports, spreadsheets, or manual re-entry.
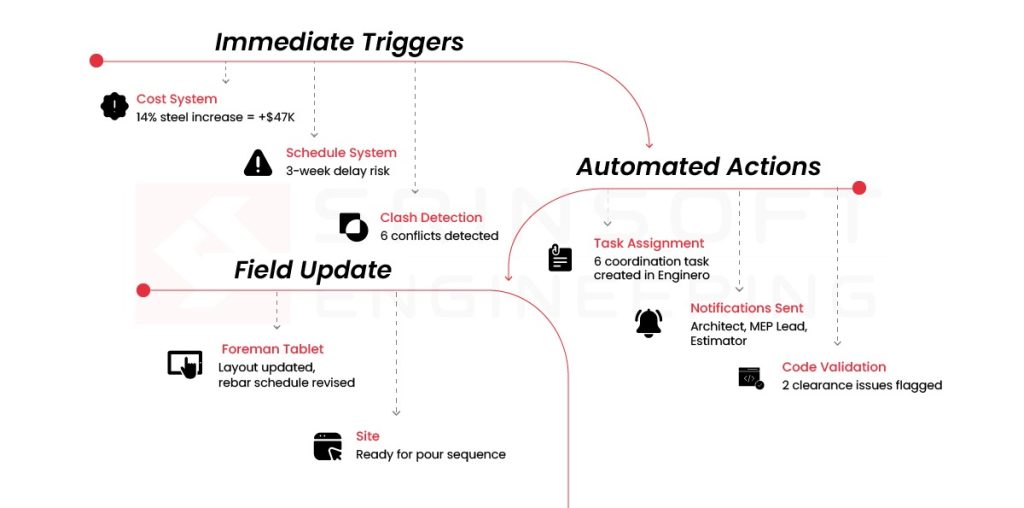
Revit ↔ Cost data:
Example: Architect changes a 6″ CMU wall to 8″ CMU on three floors. System alerts estimator within minutes that 4,200 SF of block just changed spec—before the masonry bid goes out.
Revit ↔ Schedule:
Example: Navisworks finds 47 clashes between ductwork and structural steel. Automation creates 47 tasks, assigns 31 to mechanical sub and 16 to steel fabricator, each with the exact clash location.
Revit ↔ Field:
Example: Electrical panel location moves 8 feet during morning coordination call. Updated layout pushes to foreman’s tablet automatically. Rough-in happens in the right location that afternoon instead of two days later after the “did anyone send updated drawings?” email chain.
How Integration Transforms Your Revit Model
Integration turns them into active project intelligence.
Model enrichment: Automated data pulls from your cost system, schedule, and fabrication shops populate Revit parameters in real-time.
Bi-directional updates: Field changes flow back to the model automatically. Foreman marks an electrical panel relocation on their tablet during rough-in. Integration updates and logs the change in your RFI system.
Intelligent model behavior: The model validates itself based on project constraints. Mechanical engineer increases duct size. Integration checks: Does this exceed the ceiling plenum depth? Does it clash with structural? Does the CFM change impact the schedule milestone for duct fabrication? Does the material cost spike exceed the approved budget variance?
The Three Automations That Pay for Themselves in 60 Days
Did you know: Construction Workflow Automation Market size was valued at USD 4.3 billion in 2023 and is anticipated to grow at a CAGR of over 8.5% between 2024 and 2032
Forget comprehensive transformation. Start with one of these.
Automation #1: Clash Detection → Action Item Pipeline
✔️Automated State: A 340-unit multifamily project had 1,200+ clashes between MEP trades in the podium level. Automation sorted them: 400 to mechanical, 350 to electrical, 280 to plumbing, rest to structural. Each trade got Enginero tasks with exact clash locations and affected elements. Mechanical sub resolved their 400 clashes in 3 days.
Automation #2: Quantity Takeoff Sync
✔️Automated State: Structural engineer revised column sizes on floors 8-12 of an office tower. Automation flagged a 14% increase in structural steel tonnage within 2 hours of model update. Estimator caught it before steel fabricator locked pricing. Early detection saved $180K—the design got value-engineered to hybrid concrete/steel before commitments were signed.
Automation #3: Shop Drawing Cross-Reference
✔️Automated State: HVAC contractor submitted 80 VAV box shop drawings for a hospital project. Automation cross-checked each unit’s CFM rating, duct connection size, and electrical specs against model parameters. Flagged 12 units with CFM mismatches (critical), 5 with wrong voltage (critical), 28 with minor dimensional variances (approved automatically). BIM manager reviewed only the 17 critical conflicts instead of all 80 submittals. Review time dropped from 2 weeks to 3 days.
ROI: One MEP package review dropped from 2 weeks to 3 days. Multiply that across 40+ submittal packages per project.
Most teams see ROI within 60 days. Not because the automation is complex, but because the manual process was that expensive.

The Build vs. Buy Decision
The real question is whether to build it custom, buy a platform, or script it yourself.
Use Dynamo/Grasshopper for single-model operations your team already knows. Good for proof of concept. Limited when you need to connect external systems.
Buy a platform when it’s a common workflow (clash management, model checking) and you need pre-built UI with ongoing support. Fast deployment, but you’re locked into their feature set and pricing model.
But custom development
Build custom when your workflow is specific to how your company operates, when you’re connecting three or more systems, or when you’ll deploy it across 10+ projects. This is where the real leverage sits.
Off-the-shelf tools solve generic problems, but your problems are not generic. The way you handle submittals, coordinate MEP trades, or track cost changes—that’s specific to your operation. Custom development codifies your process advantage and scales it across every project team.
Potential Example: Your preconstruction workflow pulls quantities from Revit, cross-checks them against internal cost history, flags high-risk items based on past subcontractor performance, and routes approvals through a defined review sequence.
Custom development automates the entire pipeline. Revit → cost database → risk scoring → approval routing → notifications. Build it once. Deploy it across 50 projects. That’s where a $30K integration turns into $500K in annual operational efficiency.
Try The Hybrid Approach : Start with a Dynamo proof of concept. Document time savings for 2-3 months. Use that data to justify custom development. Your internal champion needs numbers, not possibilities.
Budget reality: Custom integration runs $15K-$40K depending on complexity. Compare that to the $125K annual cost of manual processes from Section 1. Most GCs break even in 6-12 months, then it’s pure margin improvement.
The Implementation That Doesn’t Derail Your Current Project
If you can draw it, you can automate it.
Step 1: Open last week’s project status report. Identify the one data transfer process mentioned most—the thing that always takes longer than it should.
Step 2: Time it. Use a stopwatch next time someone runs that process.
Step 3: Sketch the data flow on a whiteboard. System A → manual step → System B. If you can draw it, you can automate it.
Step 4: Search “[System A] API documentation” and “[System B] API documentation.” If both exist, integration is possible. Most project management and BIM tools have APIs.
Step 5: Block 2 hours next week to prototype it yourself or spec it for development.
The runway is shorter than you think.
If you’ve timed a workflow and it’s costing you real hours, we can automate it. No platform switch. No enterprise overhaul. One integration, scoped to one problem, with a clear ROI.
Talk to us at Srinsoft Engineering →
Direct Answer
BIM data automation connects your existing tools—Revit, cost systems, project management platforms—so they exchange data automatically. No more manual exports, spreadsheets, or version control chaos. Three specific automations (clash detection pipelines, quantity sync, shop drawing cross-reference) pay for themselves in 60 days. Custom development costs $15K-$40K and breaks even in 6-12 months against your current $125K annual manual process tax.
1. How do I know which Revit workflow is worth automating first without overengineering it?
Start with the workflow that people complain about most. Time it once. If it runs weekly and burns hours, it’s a candidate. If it touches cost, schedule, or submittals, it moves to the front of the line.
2. Is custom BIM integration really cheaper than buying a platform when you factor in maintenance?
Yes, when the workflow is specific to how you work. Platforms cost less upfront, but keep charging forever and force process changes. Custom costs more once, stays focused, and usually pays back faster.
3. Can Revit actually push changes automatically to cost and schedule systems or is this mostly theoretical?
It’s real. Revit exposes data through APIs. Cost and schedule tools do the same. Integrations already push quantities, parameters, and changes automatically when set up correctly.
4. What tools or APIs are typically used to connect Revit with estimating and project management software?
It’s real. Revit exposes data through APIs. Cost and schedule tools do the same. Integrations already push quantities, parameters, and changes automatically when set up correctly.
5. How long does it realistically take to see ROI from BIM data automation on an active project?
Most teams see measurable ROI from BIM data automation within 1 to 3 months. Not because automation is magical, but because the manual workflows it replaces are often repetitive, slow, and expensive.
That said, automation is not plug-and-play. Expect an initial phase of trial and error as workflows are tested and refined to fit the project’s needs. This adjustment period should be factored into ROI calculations. Once the friction points are identified and resolved, automating the right parts of BIM becomes far easier and the efficiency gains compound quickly.